
January 29, 2024
18 min read
You don't know Node.js
Name of the post was inspired by a popular Javascript book called “You don’t know JS” .
Nodejs is more than you think, I will try to prove this point and tell about modules of Nodejs that you probably didn’t know about.
Let’s begin!
Event Loop
Even though everybody knows about event loop, not so many people know that it’s actually a part of Nodejs runtime. Not a part of Javascript and not even a part of V8 engine, but a part of Nodejs. It heavily relies on libuv library written in C for non-blocking asynchronous operations. At the same time browsers like Chrome also have event loop, but it’s actually a different implementation.
I’m not going to talk about event loop in this article, however it was impossible not to mention it here.
Event Emitter
We will start with a bit easier concept Event Emitter. This class is a fundamental part of Node.js’s asynchronous event-driven architecture.
Node.js Event Emitter is used to implement pub-sub pattern. The idea is very simple: emitter is a publisher which emits named events and callback functions are registered as subscribers.
You can create instance of EventEmitter or inherit from it to create your own class.
import { EventEmitter } from 'events';

const eventEmitter = new EventEmitter();
You are probably familiar with events by using Javascript in the browser: mouse click, input on change and so on. EventEmitter class has two mains functions
emit and on.
emitis used to trigger the eventonis used to register event listener
import { EventEmitter } from 'events';

const eventEmitter = new EventEmitter();

eventEmitter.on('sendMessage', (message) => {
  console.log(message);
});

eventEmitter.emit('sendMessage', 'Hello Nodejs');
When you emit an event you must give it a name. Name of event is used to register listener. You can also send some data together with an event as arguments.
If you add
console.log()afteremit()function, then you will see it after the log inside event callback. This is because events are executed synchronous. Please consider using async function for callback in case you need.
There can be multiple listeners to the same event. Event callbacks will be executed in the order they were registered.
eventEmitter.on('event', () => console.log(1));
eventEmitter.on('event', () => console.log(2));
eventEmitter.on('event', () => console.log(3));

eventEmitter.emit('event'); // 1 2 3
You can also remove listeners by calling functions like removeListener() and removeAllListeners().
Buffer
Buffer is used to store and manipulate binary data in Nodejs. Buffer class is inherited from Uint8Array and is internally represented as fixed sequence of bytes.
What is binary data?
Examples of binary data are images, files, audio, video and raw data from a network.
You can create buffer and choose its size using alloc() function. By default buffer is filled with zeros. This how you can create 3 bytes buffer.
import { Buffer } from 'buffer';

const buffer = new Buffer.alloc(3);

buffer[0] = 0;
buffer[1] = 1;
buffer[2] = 256;

console.log(buffer); // <Buffer 00 01 00>
Please note that since it’s a byte array, values can be only in range 0 - 255. For value 256 we get 0 because it’s a byte overflow.
Buffers can be created from string, byte array or another buffer. You can also specify buffer encoding.
const buffer = Buffer.from('hello', 'utf8');

console.log(buffer); // <Buffer 68 65 6c 6c 6f>
console.log(buffer.byteLength); // 5

console.log(buffer.toString('utf8')); // hello
console.log(buffer.toString('hex')); // 68656c6c6f
In this example buffer is created from string 'hello'. Every char in a string is 1 byte (not always), so our buffer should have 5 bytes size. When you console log buffer it shows every byte in hexadecimal notation, but you can call toString() and specify the encoding.
To prove that Buffer is actually an array of bytes you can iterate over it with simple for loop.
const buffer = Buffer.from('hello');

for (const b of buffer) {
  console.log(b); // 104 101 108 108 111
}
Bytes are printed in decimal notation here
Stream
Streams in Node.js are used for processing data in chunks, piece by piece in a sequential way. They can be readable, writable and both (duplex).
You can create new instances of Readable and Writable streams, however it is usually not necessary to import stream module to use them.
import { Readable } from 'stream';

const readableStream = Readable.from('hello streams');

readableStream.on('data', (chunk) => {
  console.log(chunk); // hello streams
});
A common use case for stream is reading or writing large amount of data. If you read a big file all at once it will be fully loaded in memory. However with a stream you can read file in chunks and save memory.
Let’s assume we have a file called file.txt which contains just one line hello. This is an example of reading file using readable stream.
import fs from 'fs';

// chunk size is 1 byte
const readStream = fs.createReadStream('file.txt', { highWaterMark: 1 });

readStream.on('data', (chunk) => {
  console.log(chunk.toString()); // h e l l o
});
highWaterMarkparam is optional, default value is 64 kb. In this example I wanted to read 1 letter at time. Because we know that 1 letter equals 1 byte we can define size of chunk as 1 byte.
You can notice that streams are actually instances of EventEmitter. It processes a chunk of data and emits an event called data.
Chunks values are actually of type Buffer. This is why we need to call toString() to see one letter per console log. In this example chunk buffers have 1 byte size.
Now let’s create a file using writable stream.
const writeStream = fs.createWriteStream('example.txt');

writeStream.write('hello ');
writeStream.write('world');
writeStream.end();
This should create a file called example.txt in current directory with content hello world. We can call write() function multiple time to push chunks of data to the writing stream and then finish stream by calling end() function.
Classic examples of writable streams include: http.ServerResponse, fs.createWriteStream, zlib.createGzip(), process.stdout.
zlib
Module zlib in Node.js provides compression functionality using Gzip, Deflate/Inflate, and Brotli.
We use compression algorithms to reduce the amount of space needed for a file. Compression and decompression functions work with Streams.
Let’s again assume we have a file called file.txt which contains just one line hello and we want to compress it. For this we can use createGzip() function to create a gzip transformer and use it in stream pipeline.
import { createGzip } from 'zlib';
import { pipeline } from 'stream';
import { createReadStream, createWriteStream } from 'fs';

const gzip = createGzip();
const source = createReadStream('file.txt');
const destination = createWriteStream('file.txt.gz');

pipeline(source, gzip, destination, (err) => {
  if (err) {
    console.error('Compression failed', err);
  } else {
    console.log(`Compression successful!`);
  }
});
As I mentioned before zlib module mostly works with streams. Function createGzip() returns a TransformStream (or ReadWriteStream).
This stream is basically a transformer between input and output data. Then we need pipeline() function from stream module to be able to create a chain of streams. We can pass to this function our read, transform and write streams. Of course order of arguments is important here 😄!
Pipeline will process data in chunks, where every chunk will be read, compressed and then written to file. After running this code you should have gzip file created with name file.txt.gz.
Now let’s have a look at the exactly opposite example. We want to read gziped file and extract its original content. This can be done very easy by again using pipeline, but this time use gunzip transform from createGunzip.
import { createGunzip } from 'zlib';
import { pipeline } from 'stream/promises';
import { createReadStream, createWriteStream } from 'fs';

const gunzip = createGunzip();
const read = createReadStream('file.txt.gz');
const write = createWriteStream('file-gziped.txt');

await pipeline(read, gunzip, write);
Here I used promisified version of
piplinewhich works with async/await. Most of modern Node.js modules has promisified versions which converts callback-based methods to promise-based e.gfs/promises.
After running this code you should have a file file-gziped.txt with its original content.
crypto
The crypto module provides cryptographic functions useful for creating hashes, signing, verifying, encrypting and decrypting data.
For example we can easily create a sha256 hash from a string by using createHash().
import crypto from 'crypto';

const hash = crypto.createHash('sha256');
hash.update('hello world');
const output = hash.digest('hex');
console.log(output); // b94d27b9934d3e08a52e52d7da7dabfac484efe37a5380ee9088f7ace2efcde9
I know it may look confusing but by cryptographic rules we must create a hash object first, then
update()it with our content and then calldigest()to produce an output in specified encoding.
Another useful function from this module is randomBytes(). This function will produce a Buffer of cryptographically secure random bytes of given length.
import crypto from 'crypto';

const buffer = crypto.randomBytes(16);
console.log(buffer.toString('hex')); // random 16 bytes hexadecimal string
More common use case for crypto module is actually encrypting data.
A popular example of encrypting/decrypting data usually uses an aes-256-cbc algorithm. This is a very secure symmetric algorithm, meaning the same key is used for both encrypting and decrypting the data.
import crypto from 'crypto';

const algorithm = 'aes-256-cbc';
const password = 'pass';
const salt = crypto.randomBytes(16);
const key = crypto.scryptSync(password, salt, 32);
const iv = crypto.randomBytes(16);

const cipher = crypto.createCipheriv(algorithm, key, iv);
const encrypted = cipher.update('hello world', 'utf8', 'hex') + cipher.final('hex');
console.log(encrypted); // 94366f8f470486f2477c7f0908a55e9f
In this example I encrypt "hello world" string using aes-256-cbc algorithm. For this we will need to create cipher by calling createCipheriv() function and two things key and iv. Both are of type Buffer.
They need to be as much random as possible to prevent hacking attempts. Iv is an Initialization vector and must be of specific length. Note that AES-256 uses a 256 bits length key (32 bytes) and 128 bits iv (16 bytes).
To decrypt string we can perform a very similar operation, but this time using decipher from createDecipheriv() function.
const decipher = crypto.createDecipheriv(algorithm, key, iv);
const decrypted = decipher.update(encrypted, 'hex', 'utf8') + decipher.final('utf8');
console.log(decrypted); // hello world
You must use the same key and iv to decrypt data back.
http
The http module in Node.js is needed to transfer data over the Hyper Text Transfer Protocol (HTTP). It allows to make http requests in Node.js as well as create your own HTTP servers.
This example creates a very basic HTTP server that listens to port 8080. For any request it will just return hello world string. Pretty simple, right 😃?
import http from 'http';

const server = http
  .createServer((req, res) => {
    res.write('hello world');
    res.end();
  })
  .listen(8080);
Open http://localhost:8080 in browser to see “hello world” response.
This probably looks familiar to you if you used before any Javascript backend framework like express.js or fastify. They of course use http module under the hood and simplify a lot of stuff for us, because dealing with raw http requests is not easy.
req argument represents http request and is instance of a class http.IncomingMessage which is a subclass of ReadableStream.
res argument represents http response and is instance of a class http.ServerResponse which is a subclass of WritableStream.
We can send status code and response headers by using res.writeHead() function. This means our http server suppose to return JSON content back.
res.writeHead(200, { 'Content-Type': 'application/json' });Let’s create more real world endpoint for our server. We will implement GET /hello endpoint and return some JSON data.
For this we need to check for request’s url and method, set proper header, create a response object and write it to response stream as a string.
const server = http
  .createServer((req, res) => {
    if (req.url === '/hello' && req.method === 'GET') {
      const response = {
        message: 'Hello, World!',
      };
      res.writeHead(200, { 'Content-Type': 'application/json' });
      res.write(JSON.stringify(response));
      res.end();
    }
  })
  .listen(8080);
If you try to access any other endpoint, our server will hang. This is because we only call
res.end()for/helloGET endpoint.
We can go further and have a look at example of reading POST request body. Let’s implement POST /hello endpoint that simply reads request body and logs it to console.
Even though it sounds very simple, but in reality it requires quite some operations.
We know that request is EventEmitter which emits event called data with chunks of request body. We have to make sure we read it fully and for this we need another event called end. Then we can simply concatenate chunks of data until end event is fired to get full request body.
const server = http
  .createServer((req, res) => {
    if (req.url === '/hello' && req.method === 'POST') {
      let body = '';

      req.on('data', (chunk) => {
        body += chunk;
      });

      req.on('end', () => {
        const parsed = JSON.parse(body);
        console.log(parsed);
        res.end();
      });
    }
  })
  .listen(8080);
Body chunks can be of type
StringorBuffer. In this case it isString, so to make it an object we need to callJSON.parse().
https
The https module in Node.js is needed to transfer data over HTTP TLS/SSL protocol, which is the secure HTTP protocol. Yes, https in Node.js is implemented in a separate module.
This time we will not create a server, but instead make a http request. To make http request in Node.js you need to use method https.request() which returns request object and accepts a callback function to process the response.
Here we will simply make a request to www.google.com and print to console HTML content of the google search page.
import https from 'https';

const options = {
  hostname: 'www.google.com',
  port: 443,
  path: '/',
  method: 'GET',
};

const req = https.request(options, (res) => {
  let data = '';

  res.on('data', (chunk) => {
    data += chunk;
  });

  res.on('end', async () => {
    console.log(data);
  });
});

req.on('error', (error) => {
  console.error(error);
});

req.end();
Port 443 is the standard port for HTTPS.
The options object is used to specify details about the HTTP request, such as the hostname, port, path, and method. In our response callback function, you can notice a similar pattern we already used before. Again we get a response stream and listen to data event until stream is finished. We can also handle error cases by adding a callback function for error event.
net
The net module in Node.js provides functionality to create TCP servers and clients.
How different is TCP server from HTTP? Well you probably know that HTTP utilizes TCP to transport data. TCP is transport layer protocol, while HTTP is application layer protocol. You can say that HTTP is more high level protocol which uses TCP under the hood.
Main difference is that TCP is stateful and connection-oriented, meaning a connection between client and server is established before data can be sent.
HTTP is generally considered stateless, because after the client has established a connection with a server, sent a request, and received a response, the connection is immediately dropped.
Enough theory.. 😬 Let’s create a basic TCP server and send some data to it.
import net from 'net';

const server = net.createServer((socket) => {
  socket.write('Hello from TCP server!');

  socket.on('data', (data) => {
    console.log(data.toString());
  });

  socket.on('end', () => {
    console.log('Data transmission finished');
  });

  socket.on('close', () => {
    console.log('Client disconnected');
  });
});

server.listen(3000, () => {
  console.log('Server listening on port 3000');
});
Here we create new TCP server using net.createServer() function. The callback function is called when client connects to the server, this creates an object called socket, which represents the client connection. Socket object implements EventEmitter API and has familiar to us events for reading data. These events are data and end. We can read data with the same pattern, getting chunks of data of type Buffer or String.
To respond to client you can simply call function socket.write(). Socket object is also a WritableStream.
To test this server you need to use something that can make TCP connections. Common terminal utilities for this are netcat or telnet, you maybe need to install them. This is the command to connect using netcat. You should be able to see welcome message right after connection.
> netcat localhost 3000
Hello from TCP server!
After connection is established you will see a message in terminal and then you can type any text and press enter to send data. You should be able to see data received and logged to the console on our server. Closing connection on client should result in seeing 'Client disconnected' log on server.
child_process
The child_process module provides functionality to create subprocesses in Node.js. Every Node.js application starts as a single process in your operating system and runs on a single thread (main thread).
What is a thread? A thread is the subset of a process and is also known as the lightweight process. A process can have multiple threads.
child_process module is used to spawn new processes (not threads), which can be called child processes. This module has four main functions:
spawn()fork()exec()execFile()
Each of these methods returns ChildProcess instance, which implements EventEmitter API.
These methods create processes asynchronously, but also have synchronous versions: execSync(), execFileSync(), spawnSync(). They need to be used with caution, because they will block the Node.js event loop!
spawn() and exec() are used to execute external process.
spawn() is suitable for creating long-running processes or processes with a heavy output. Child process returned by it has stdout and stderr streams to return command output or errors.
In this example we use spawn to execute a simple ls -la command to show files in current directory.
import { spawn } from 'child_process';

const child = spawn('ls', ['-la']);

child.stdout.on('data', (data) => {
  console.log(`output: ${data}`);
});

child.stderr.on('data', (data) => {
  console.error(`error: ${data}`);
});

child.on('close', (code) => {
  console.log(`child process exited with code: ${code}`);
});
We call spawn method and pass command as string and arguments in array of strings. This returns a ChildProcess instance, which has stdout and stderr properties, both of type ReadableStream. Streams implement EventEmitter API so we can listen to data events to see output of command or errors.
💡 How different is exec()?
exec() is designed to run smaller output processes and has a limit of 1 MB of output data. Child processes returned by it again has stdout and stderr properties, but this time of type String!
Output default encoding is UTF-8. You can set encoding to buffer in options, then Buffer object will be returned as output.
In this example we use exec to execute a simple ls -la command.
import { exec } from 'child_process';

const child = exec('ls -la', (error, stdout, stderr) => {
  if (error) {
    console.error(`process failed to start: ${error.message}`);
    return;
  }
  if (stderr) {
    console.error(`error: ${stderr}`);
    return;
  }
  console.log(`output: ${stdout}`);
});
exec()by default spawns a shell, similar as you running commands in terminal, on the other handspawn()is not doing it by default.
We call exec() method and pass whole command as one string and a callback function which will run when process is finished. Callback function has three arguments: error, stdout and stderr to read process output and errors.
exec() is not using streams, but returns output at once within a callback function. This is why we can turn it into promise based function using utility from Node.js util.promisify(). This makes it much more readable, have a look:
import util from 'util';
import { exec } from 'child_process';
const execAsync = util.promisify(exec);

const { stdout, stderr } = await execAsync('ls -la');
console.log('stdout:', stdout);
console.error('stderr:', stderr);
🛑 Warning: exec() and spawn() are NOT designed for spawning Node.js processes!
e.g.
exec('node index.js')
For this case we should use fork(), because it allows IPC communication between parent and child processes by sending messages.
fork() is used to spin up a whole new Node.js process. It will have its own Node runtime with its own memory, V8 instance and its own event loop! Of crouse this should not be cheap in terms of memory usage and also not fast, because of context switching 🐌!
And don’t get confused with meaning of word fork, it does NOT clone current process!
Let’s assume we have two js files: parent.js and child.js. We will start child.js using fork() function. For simplicity we will send a value to child process and let child double the value, then send it back to parent.
// parent.js
import { fork } from 'child_process';

const child = fork('./child.js');

child.on('message', (msg) => {
  console.log('Message from child: ', msg);
});

child.send({ value: 2 });

// child.js
process.on('message', (msg) => {
  console.log('Message from parent:', msg);

  process.send({ result: msg.value * 2 });
  process.exit();
});
This is the output of running this code.
> node parent.js
Message from parent: { value: 2 }
Message from child:  { result: 4 }
In this example we spawned completely new Node.js subprocess by executing child.js file.
For this we used fork() function and passed path to a another js file. fork() returns instance of ChildProcess, but this time also establishes communication channel.
Yes, it must be a separate file, which will start a new Node.js program in isolation. This means sharing values from main process memory is not possible!
The only way to communicate between parent and child is by IPC (inter-process communication) channel, meaning sending messages. Luckily values are serialized, so we dont need to parse strings (e.g we send number in this example and we dont need to cast it 😉).
Serialization of values are based on the HTML structured clone algorithm.
Parent process can send data to child by calling child.send() function and read messages by registering a callback to child.on('message') event.
Child process can receive message from parent by listening to process.on('message') event and respond to parent with process.send().
Parent program will not terminate until all spawned subprocesses are exited. So calling process.exit() is very important inside child. Alternatively parent can kill a child process by calling child.kill().
💡 What is the use case of fork()?
Well, parallel programming is the answer. It gives the ability to execute multiple Node.js applications at the same time, so in parallel. This can be useful when dealing with CPU heavy computation tasks like processing graphics, mathematical calculations, and video or image compression.
One common technique to achieve performance is splitting heavy tasks into smaller parts and let multiple cores to work on them at the same time.
Let’s have a look at this example:
console.time('time');

let counter = 0;

for (let i = 0; i < 3_000_000_000; i++) {
  counter = counter + 1;
}

console.log(counter.toLocaleString());
console.timeEnd('time');
This code just does 3 billion iterations and increases a counter. On my machine it takes around 3 seconds (depends on how powerful is your machine). How we can make it faster?
We split the task into 3 parts and calculate same number but in parallel. Each child process will do exact 1 billion iterations.
// child.js
let counter = 0;
for (let i = 0; i < 1_000_000_000; i++) {
  counter = counter + 1;
}
process.send({ counter: counter });
process.exit();

// parent.js
import { fork } from 'child_process';

console.time('time');

let counter = 0;
const child1 = fork('child.js');
const child2 = fork('child.js');
const child3 = fork('child.js');

child1.on('message', (msg) => {
  counter += msg.counter;
});
child2.on('message', (msg) => {
  counter += msg.counter;
});
child3.on('message', (msg) => {
  counter += msg.counter;
});

const childrenPromises = [
  new Promise((resolve) => child1.on('exit', resolve)),
  new Promise((resolve) => child2.on('exit', resolve)),
  new Promise((resolve) => child3.on('exit', resolve)),
];
await Promise.all(childrenPromises);

console.log(counter.toLocaleString());
console.timeEnd('time');
Same 3 billion iterations are completed within 600 ms 😃! So much faster, because we could run them in parallel using advantage of multiple cores.
Conclusion: When choosing between exec and spawn, always chose exec when you expect smaller output or a CLI command, otherwise use spawn.
Use fork when you need to create a new Nodejs process in isolation or to achieve parallelism.
cluster
The cluster module of Node.js allows to spawn multiple processes which share the same server port and handle incoming requests concurrently. This can help to distribute the workload of the requests and run each process on a separate CPU core making server more efficient.
Why do we need this?
Node.js handles perfectly I/O tasks in asynchronous way using just single process and single thread. When we build our http servers we want them to process as much user requests as possible and be very performant. Sometimes things doesn’t go so well and we have code that can block main event loop. When this happens our server is stuck and cant accept any more requests.
To demonstrate this, create a file index.js and start http server with two endpoints, one is fast and another is slow.
To make endpoint slow we will use loop with 3 billion iterations to imitate CPU heavy task.
// index.js
import http from 'http';

http
  .createServer((req, res) => {
    if (req.url === '/slow') {
      let counter = 0;
      for (let i = 0; i < 3_000_000_000; i++) {
        counter = counter + 1;
      }
      res.end(`slow response: ${counter}`);
    }

    if (req.url === '/fast') {
      res.end('fast response');
    }
  })
  .listen(3000);

console.log(`Process ${process.pid} listening on port 3000`);
Slow endpoint response time is around 3 seconds and fast is less than 20 ms. ⌛
If you hit /slow endpoint first and then immediately hit /fast, you can notice that /fast is also hanging. This is because, slow endpoint blocks Event Loop and makes CPU busy, meaning http server cant handle any requests.
To avoid this we have two options:
- make sure we never do computational heavy tasks
- use
clustermodule
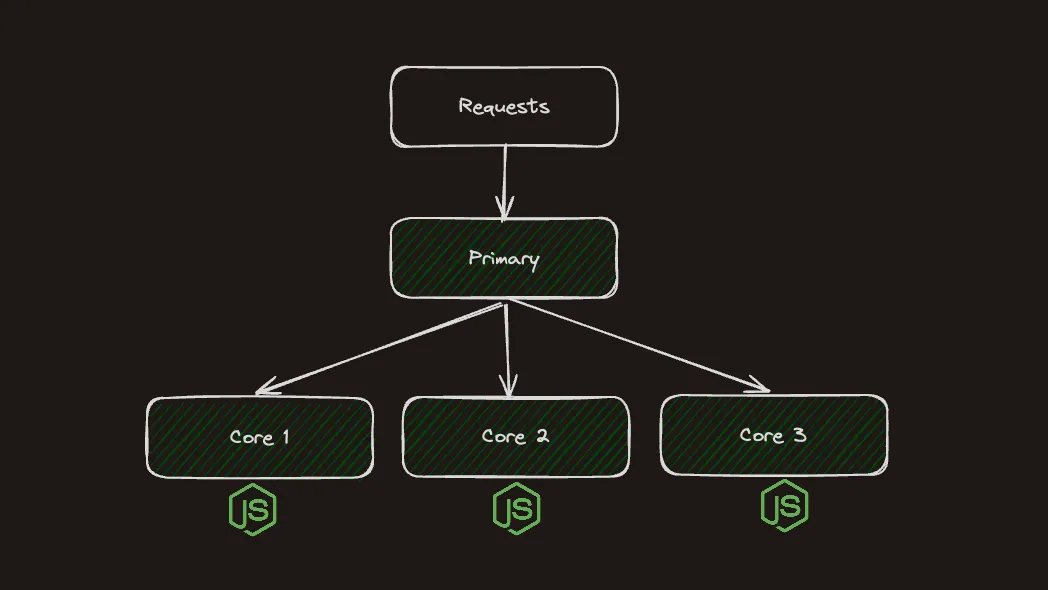
Cluster module allows us to create one primary node and as much workers nodes as you have cores available for parallelism. Cluster also acts like a load balancer and distributes requests across the workers in a round-robin fashion by default. All the workers are basically http servers which share the same port.
Now create another file primary.js with the following code:
// primary.js
import cluster from 'cluster';
import os from 'os';

const cpuCount = os.cpus().length;

console.log(`The total number of CPUs is ${cpuCount}`);
console.log(`Primary pid=${process.pid}`);

cluster.setupPrimary({
  exec: './index.js',
});

for (let i = 0; i < cpuCount; i++) {
  cluster.fork();
}

cluster.on('exit', (worker, code, signal) => {
  console.log(`worker ${worker.process.pid} has been killed`);
  console.log('Starting another worker');
  cluster.fork();
});
Here we start the same index.js file with /slow and /fast endpoints in a cluster. Now if you hit /slow endpoint only event loop of one worker will be blocked and others will be available to serve requests.
This example starts as single process, which is identified as primary and creates several child processes (workers), one per each available CPU core. Number of workers can be different for you, depends on how many core your machine has.
Worker is basically an instance of Node.js created by child_process.fork() method. Each worker runs code from index.js file, which simply starts a http server. As a result we have multiple http servers that can serve requests in parallel sharing the same port. In case worker crashes, we can spawn a new one, this is done inside exit event callback.
If you run primary.js you should see similar output:
> node primary.js
Primary pid=58882
Process 58883 listening on port 3000
Process 58884 listening on port 3000
Process 58889 listening on port 3000
Process 58887 listening on port 3000
Workers are instances of class Worker, because they are child processes they can talk to main process via IPC. Workers can send messages to parent in the same way as processes created by fork() method. Cluster has array of workers which can be accessed by id.
// inside primary.js
for (const id in cluster.workers) {
  cluster.workers[id].on('message', ({ msg }) => {
    console.log('worker sent:', msg);
  });
}

// inside index.js
if (req.url === '/fast') {
  process.send({ msg: `processing on worker ${process.pid}` });
  res.end('fast response');
}
In modern architecture using cluster module is not popular, moreover it’s limited by capacity of the machine you are using. When you want to scale horizontally its more common to add more nodes instead of using multiple core of one node. In case you still want to cluster Node.js application consider using pm2 package.
worker_threads
It’s time to talk about controversial topic in Node.js which is multithreading 😄!
The worker_threads module allows you to execute Javascript code in parallel using threads. Workers threads can be used for offloading CPU-intensive tasks, such as complex calculations, image resizing, or video compression.
💡 How is it different from cluster?
Each worker thread in Node.js has its own main loop, such as libuv. Similarly, each cloned Node.js process in clustering also has its own main loop.
Clustering is a technique used to distribute incoming requests to multiple copies of a Node.js server, allowing for load balancing.
Worker threads, on the other hand, allow a single Node.js process to delegate long-running functions to separate threads, preventing them from blocking the main loop.
Main difference from child_process or cluster is that worker threads can share memory. This can be done with help of ArrayBuffer and SharedArrayBuffer instances.
Because worker threads do not require allocation of extra memory, they are more lightweight than processes created with fork(). Threads are similar to processes and also run in parallel using multiple cores, but spawning too many threads won’t be beneficial and can cause even slowdown of the system.
Now let’s write code to imitate a CPU bound task:
console.time('time');

let counter = 0;

for (let i = 0; i < 3_000_000_000; i++) {
  counter = counter + 1;
}

console.log(counter.toLocaleString());
console.timeEnd('time');
We do 3 billion iterations in a loop, which takes on my machine around 3 seconds. We want to speedup this task and calculate same number with Workers. Each worker will do 1 billion of iterations and return result to main thread, then we sum results of workers.
First let’s create a worker.js file.
// worker.js
import { workerData, parentPort } from 'worker_threads';

let counter = 0;
for (let i = 0; i < 3_000_000_000 / workerData.numberOfWorkers; i++) {
  counter = counter + 1;
}

parentPort.postMessage(counter);
Worker thread can communicate with parent thread via messaging channel. workerData represents data sent to worker from parent and parentPort.postMessage() function is used to send data back to parent.
Now create index.js file and offload our CPU heavy task by splitting it among threads.
// index.js
import { Worker } from 'worker_threads';

console.time('time');

const NUM_OF_WORKERS = 3_000_000_000 / 1_000_000_000;
const workers = [];

const createWorker = () =>
  new Promise((resolve, reject) => {
    const worker = new Worker('./worker.js', {
      workerData: { numberOfWorkers: NUM_OF_WORKERS },
    });
    worker.on('message', (data) => {
      resolve(data);
    });
    worker.on('error', (error) => {
      reject(error);
    });
  });

for (let i = 0; i < NUM_OF_WORKERS; i++) {
  workers.push(createWorker());
}

const results = await Promise.all(workers);
console.log(results.reduce((acc, val) => acc + val, 0).toLocaleString());

console.timeEnd('time');
To create a worker we need to create new Worker instance and pass file path. Additionally you can send data to worker using workerData param. In this example I send to worker max amount of threads so each worker can calculate only its part. Worker class implements EventEmitter API, meaning we should listen for events like message and error. To make code run in async manner we can create worker with Promise and resolve it when we got response from worker.
Then we create array of worker promises and wait for all of them to finish and calculate result value. This code should complete the same task but much faster, for me it took round 600ms! Well done 🎉!
💡 How to share memory with SharedArrayBuffer?
One of the advantages using worker_threads is sharing memory with main process. To create a shared block of memory we need to use SharedArrayBuffer.
SharedArrayBuffer is binary data buffer of fixed length which can be accessed and modified directly from workers or from main thread. Accessing the shared resource simultaneously or performing operations leads to race conditions. To synchronize, atomic operations are needed.
Any other type of data sent to worker threads as
workerDatawill be copied,SharedArrayBufferis the exception.
Let’s create a shared array buffer of one integer size (4 bytes). Then we can convert it to an array of numbers, in our case we have memory for just one number.
const sab = new SharedArrayBuffer(Uint32Array.BYTES_PER_ELEMENT);
const sharedArray = new Uint32Array(sab);
Now we can pass this shared array to worker as workerData. Our worker can directly assess and modify shared array data.
// index.js
const worker = new Worker('./worker.js', {
  workerData: { sharedArray },
});

// worker.js
import { workerData } from 'worker_threads';
workerData.sharedArray[0] = 10; // changes will be reflected in main thread
As we know working with shared resources is dangerous, when we don’t have any lock mechanism to prevent race conditions. For this case we have Javascript primitives called Atomics.
When memory is shared, multiple threads can read and write the same data in memory. Atomic operations make sure that predictable values are written and read, that operations are finished before the next operation starts and that operations are not interrupted.
Now let’s complete our example using SharedArrayBuffer and Atomics. This is updated worker.js file.
// worker.js
import { workerData } from 'worker_threads';
const { sharedArray, numberOfWorkers } = workerData;

let counter = 0;

for (let i = 0; i < 3_000_000_000 / numberOfWorkers; i++) {
  counter = counter + 1;
}

Atomics.add(sharedArray, 0, counter);
We get sharedArray as workerData, then calculate our counter and add it to number at position 0 of shared array, using Atomics.add() function.
Operation like this: sharedArray[0] += counter is not atomic! Actually there are three operations here: read, summ and assign. Atomics guarantee that operation will be performed as single transaction in memory to prevent race conditions.
Now please have a look at updated index.js file.
// index.js
import { Worker } from 'worker_threads';

console.time('time');

const NUM_OF_WORKERS = 3_000_000_000 / 1_000_000_000;
const workers = [];

const sab = new SharedArrayBuffer(Uint32Array.BYTES_PER_ELEMENT);
const sharedArray = new Uint32Array(sab);

const createWorker = () =>
  new Promise((resolve, reject) => {
    const worker = new Worker('./worker.js', {
      workerData: { numberOfWorkers: NUM_OF_WORKERS, sharedArray },
    });
    worker.on('error', (error) => {
      console.log('worker error:', error);
      reject(error);
    });
    worker.on('exit', (code) => {
      resolve(code);
    });
  });

for (let i = 0; i < NUM_OF_WORKERS; i++) {
  workers.push(createWorker());
}

await Promise.all(workers);
console.log(sharedArray[0]);

console.timeEnd('time');
Here we create SharedArrayBuffer and send it as workerData to all workers. All workers use the same array instance. This time we dont resolve worker process on data event but on exit. This is because workers dont send result back to parent, but use shared array. After all workers finished their job, we simply log number from shared array at position 0.
Spawning too many workers can cause thread starvation. Managing worker thread pool is challenging, in case you want to use multiple workers consider using piscina.
Final
Huh, it was a long journey! You can find more info in official documentation.
I hope you can feel now more confident using unpopular features of Node.js 😄!